2-1/4 teaspoon instant or active dry yeast
1-1/4 cups water, warmed to 105-115°F
1 tablespoon granulated sugar
1/4 cup honey
2-1/2 cups (300g) bread flour
1-1/2 cups (170g) whole wheat flour
1-1/2 tablespoons cocoa powder
1 teaspoons espresso powder
2 tablespoons molasses
1 teaspoon salt
1/4 cup cornmeal, for dusting the bottoms of the loaves
1/4 cup rolled oats, for topping the loaves
Step 1: Activate yeast
In the bowl of a stand mixer (here’s our favorite mixer) fitted with a dough hook, combine the yeast, warm water and sugar. Let sit for 5 minutes until foamy. Meanwhile, in a separate bowl, sift together the bread flour, whole wheat flour, cocoa powder and salt. Set aside.
Tip: Be sure to warm your water to the proper temperature. Somewhere between 105 and 115° is ideal. Any cooler and the yeast will not fully activate. Any warmer and you might kill the yeast.
Step 2: Combine ingredients
To the mixer, add the honey, molasses and espresso powder. Stir to combine and then add the sifted ingredients to the mixer. Blend on your mixer’s first speed, about 3 minutes, then knead in your mixer for an additional 8-10 minutes on your mixer’s second speed. The dough is ready when it’s smooth and begins to pull away from the sides of the mixer. The dough should be slightly tacky but not sticky.
Tip: If the dough is sticky, add a little more bread flour to the dough, a tablespoon at a time and continue to knead until smooth.
Step 3: First rise
Transfer the dough to a clean, lightly oiled bowl and cover. Let rise in a warm place for 90 minutes, or until doubled in size.
Proofing tips:
- Proof at Room Temperature
The traditional way to proof bread is in a glass bowl at room temp. (You can also use a proofing basket, or a bread tin if you want to create a specific shape.) This route is perfect for nice and toasty kitchens, especially during the warmer months.
To proof, cover the bowl with a damp paper towel or cloth. If your bowl is deep enough, use cling wrap. If working with a particularly sticky dough, rub the tiniest amount of oil onto some cling wrap to help prevent the dough from sticking (a spritz of cooking spray works, too).
Test Kitchen tip: Mark the outside of the glass bowl when you place the dough inside, so you won’t have to eyeball whether or not it doubled in size. - Proof Bread in the Oven
You may be wondering, can I really use my oven to proof bread? The answer is yes! Our go-to method for proofing bread when it’s a bit cold inside is to pop the dough in the oven. And nope—you won’t be turning it on!
To proof bread in the oven, place a glass baking dish on the bottom rack of the oven and fill it with boiling water. Stash your dough on the middle or top rack and shut the door. The steam and heat from the boiling water will create a warm and steamy environment for the dough—exactly what you want for a good rise.
If your bread requires a longer proof, like this chocolate babka, I recommend refreshing the hot water every 30 to 45 minutes to keep things working. - Proof Bread with a Slow Cooker
Think you couldn’t love your slow cooker more? Well, it turns out you can use this appliance to proof bread dough. Fill your slow cooker halfway with water and set to the low setting (which will heat the water to about 200ºF). Put the lid on upside down, lay a dishtowel on top, then set your bowl of dough on top. The radiant heat from the hot water will help the bread rise. - Use a Proofing Box
If you’re a serious bread baker, you might want to skip the homemade shortcuts and invest in a bread-making tool that helps you proof. A proofing box will maintain a consistent temperature and humidity inside, allowing you to get a perfect rise every single time. With a perfect yeast-friendly environment, this proofing box can help you proof bread a bit quicker than room temp, too. That’s a big win for serious bakers! That means more loaves of the good stuff in less time.
Step 4: Shape the loaves
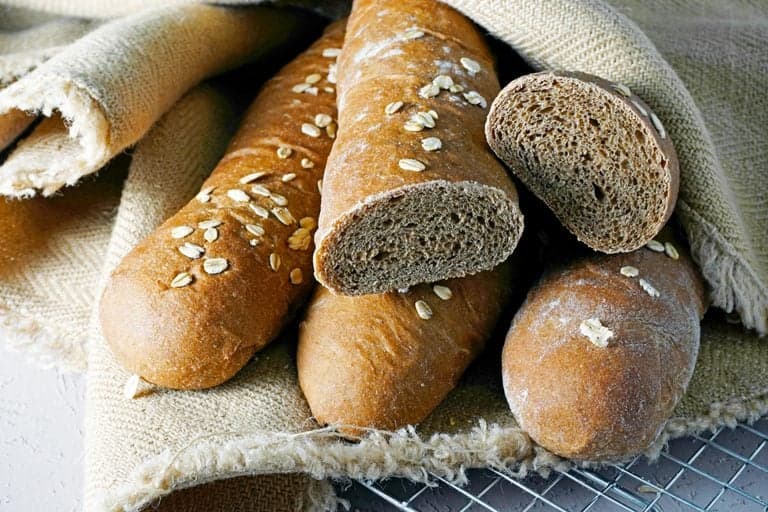
Spread a bit of cornmeal out on a piece of parchment paper. Then, turn out the dough onto a lightly floured surface and divide it into four equal-sized portions. Roll each into a smooth log, about 12 inches long, and press the bottom of each loaf into cornmeal to lightly coat the bottom.
Transfer loaves to a parchment-lined baking sheet about 4 inches apart.
Step 5: Second rise
Gently brush the loaves with water and sprinkle lightly with rolled oats. Cover loosely with a clean towel and let the dough rise in a warm place for 60 minutes. Loaves are ready when the dough is puffed and doubled in size.
Step 6: Bake
Preheat the oven to 350°. Uncover the loaves and bake for 25 to 35 minutes. Remove and let cool for at least 20 minutes prior to slicing.
Serve warm with pats of butter. (Here’s how to soften butter quickly if you’ve forgotten to pull it out ahead of time!)
Tip: Wondering how to tell when these dark-colored loaves are fully baked? Tap them. They should sound hollow, and they should be darker around the edges, particularly at the base. You can also use an instant-read thermometer and remove the loaves when they reach an internal temperature of 190°.